Saturday, April 20, 2013

Handwriting Made Easy (or at least easier!)

I realized the other day when I had some teacher friends visiting my classroom from another school that I have explained my handwriting practice/assessment so many times that I need to do a post on it!  This way, I can say, "Oh, just check out my posting about handwriting; it has pictures of each level, explains how students work through the levels, how I grade them, and everything!"  Of course, this is not a complete handwriting curriculum, nor is it perfect, but I think it's worth sharing as it might be of some benefit to teachers lost in the sea of fine motor skill ineptness that seems to be engulfing our youth!

Let me begin with Level One.  It involves students writing the sentence "The quick brown fox jumps over the lazy dog!" ten times, all in lower case, on handwriting paper, as shown above.  Many adults know this sentence because it contains all the letters in the alphabet.  Before we begin our literacy centers at the beginning of the year, I introduce all of the handwriting levels and explain my expectations for each level, as well as showing them the laminated examples they can reference throughout the year as they progress through the levels.  When teaching lower grades, you will have to have extensive conversations about the "upper," "mid," and "lower" lines on handwriting paper, where to begin each letter, etc. As students approach third grade, they will need explicit instruction on writing in cursive.  Luckily for me, by fourth grade they have been, for the most part, already introduced to both print and cursive and are just needing some polishing.  I will do another posting on what I do for my handwriting interventions for students who struggle with fine motor skills.

When students can write Level One clearly and accurately, they advance on to Level Two.  If they are still struggling with forming a few of the letters, I simply write out the letters they are struggling with on their page, have them watch as I write them and explain how to form them, and then have them trace and practice writing them a few dozen times.  I have them do the same sort of thing if they are struggling with spacing between letters/words or if their print is too large or small, but I generally write the full sentence out for them while explaining and then have them do a few more sentences.  Level Two is the exact same sentence, but this time they write it on lined paper.

The third level involves upper case letter writing on handwriting paper, as the students write: "THE FIVE BOXING WIZARDS JUMP QUICKLY?"  This is, obviously, to practice their "caps lock" writing and a new form of punctuation, and it also includes every letter in the alphabet.  Level Four, also shown below, is the same sentence but on regular lined paper (I get college and wide ruled paper donated to my classroom and have no preference).
When students have mastered Level Four, they have illustrated that they have the ability to write every letter, in sentence form, in lower and upper case.  Now they can advance to Level Five, which is the alphabet in lowercase and uppercase in cursive three times on handwriting paper with the added midline to guide them.  They do the same thing on lined paper for Level Six.  Here are my examples:
Once they've got the hang of the alphabet, it's time to check in on how well they connect letters in cursive with the seventh level.  Here, they write, "The quick brown fox jumps over the lazy dog!" ten times in cursive on regular lined paper.  This is usually the most difficult level for students to grasp at first, but with practice, they can quickly develop this skill.
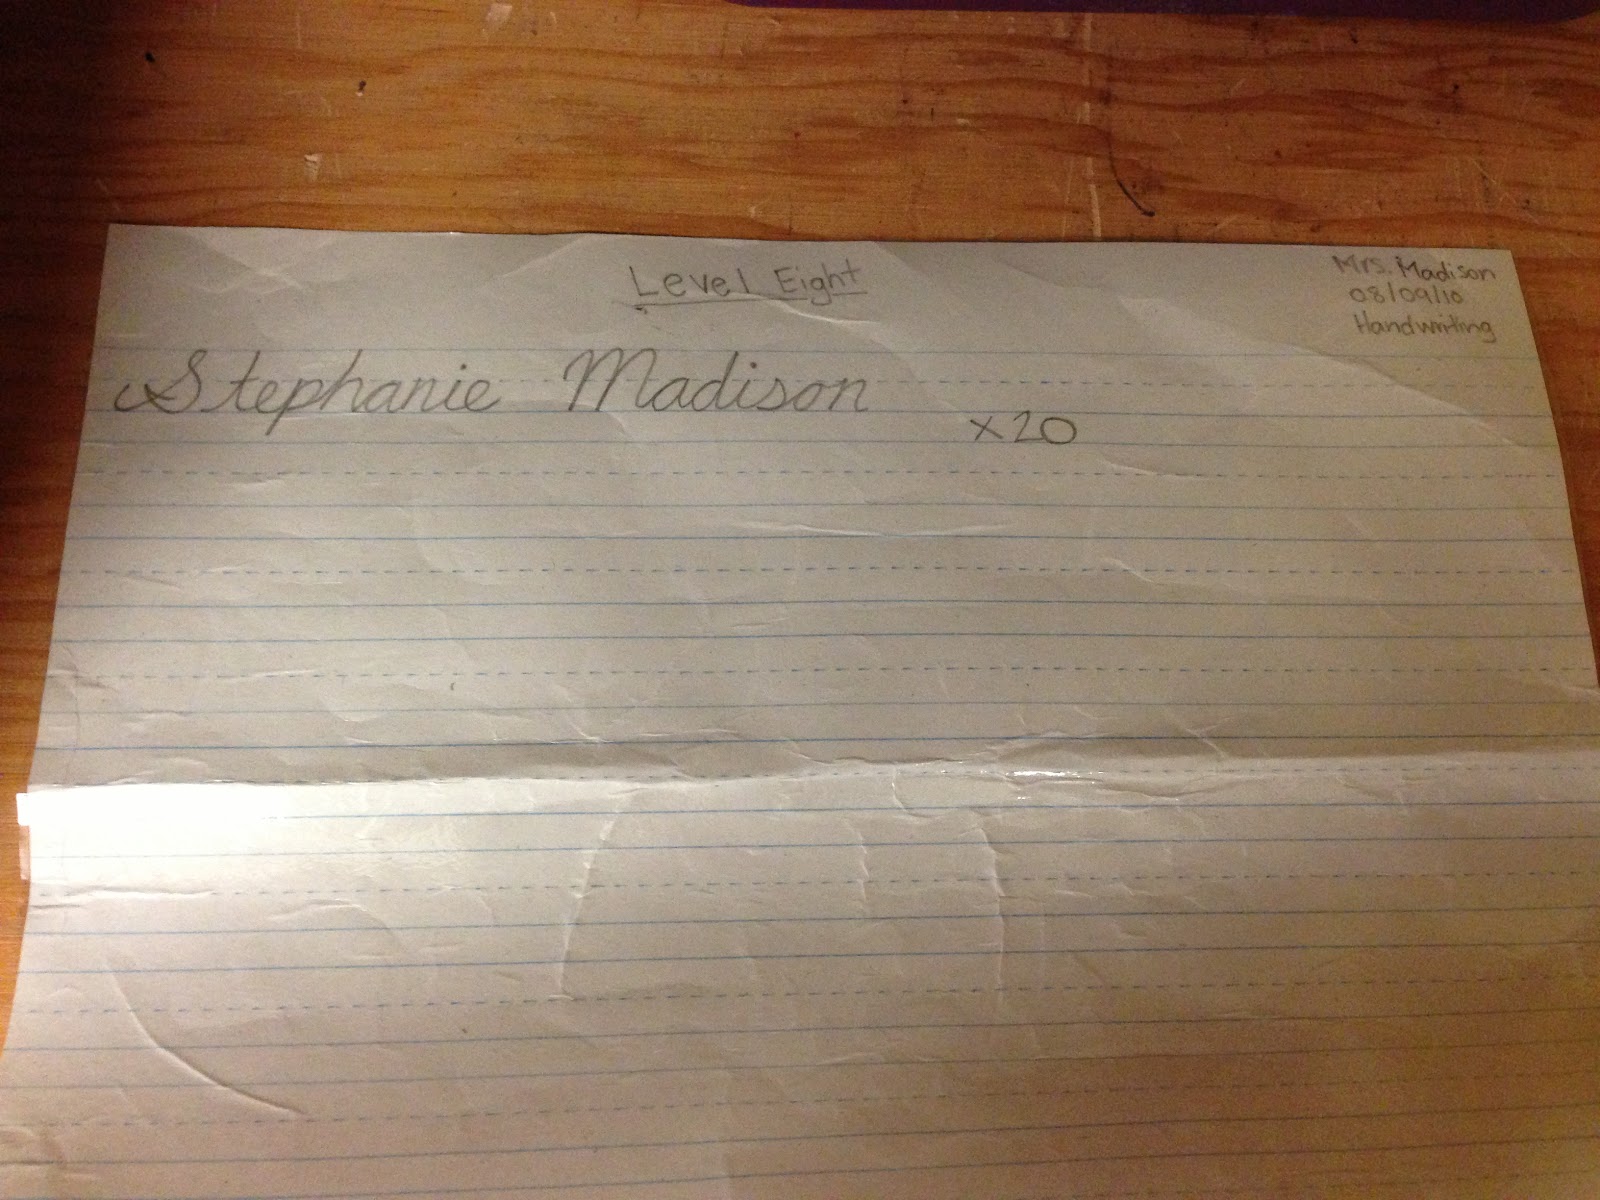
Last is Level Eight.  This level involves the students writing their first and last name in cursive twenty times.  I do not spend that much time teaching and practicing cursive in my classroom simply because most of my students will not need to use it much in real life, other than signing their name on checks, mortgages, etc!  That's part of why I made the final level signing their name.
Once students are through all 8 levels, they get to practice their typing skills on the computer!  They can go to freetypinggames.net or another site that's linked on our school website to learn how to type, practice, and play typing games for free.  We only have 5 computers in our classroom, however, so when they are being used (which is pretty much every time we do literacy centers) students have the option of "practice typing" on these keyboards!  Look around at garage sales, Goodwill, thrift shops, etc for old keyboards, or put a posting on Craigslist for some to be donated to your classroom.  I cut the cords off of them, and viola!  Now students can practice typing without actually needing a real computer.  (I also use these keyboards for one of our word work options, which will be a whole new post!)

So there you have it.  It's an easy way to make handwriting a part of your literacy centers and students are completely independent while doing each level (I have them turn the level in to the inbox when they are done with it and go right on to the next level, and then I meet back with them to either congratulate them on a job well done, or to help them with the letters/words they're still struggling with.  I track their progress with a simple chart, like the one shown below.)

How do you teach/practice/track/assess handwriting in your classroom?  What have you found to be helpful in assisting struggling writers?  How might I improve my centers, and what do you do help students learn to type, since that is more of the focus for the CCSS (even though writing legibly is still important!)?  If you would like a PDF copy of all of the levels, just download it for FREE from my TeachersPayTeachers store or paste your email in the comments below.  Leave a comment, share, repin this, visit http://www.teacherspayteachers.com/Store/Stephanie-Madison to support my efforts, and check back for more!

Monday, April 1, 2013

Celebrating Bilingual Literacy!


Every year, our school has a "Celebration of Students" night where families are invited into the school to see their students' art work and written work displayed on the walls.  We have an artist come in to lead a craft/art project, and give out free popcorn as well as having an "Open Mic" for presentations of music, poetry, etc.  Another aspect of our art-filled evening that we added last year is a bilingual section to specifically highlight the biliteracy that many of our students have worked hard to develop.  We had Spanish, Russian, Mandarin, and Dutch pieces featured last year.

Here is a story written in English and Russian.  Below is a report written in English and Dutch.

 A poem in English and Spanish is shown below.

This bulletin board was also given a special location near the principal's office at the front of the school.  It's just one of the many ways that we celebrate and show the value of knowing multiple languages at our school.  I organized it by simply asking each classroom teacher to invite their bilingual students to submit a piece of work for the special acknowledgment, and then just added the bilingual border.  How does your school celebrate biliteracy and bilingualism?  What do you do in your own classroom to encourage this advancement in literacy?  Leave a comment, share, and check back for more soon!

Tuesday, January 1, 2013

You Are a Gift

This is such a touching project that I stole from my friend Heather (she even hand-made a poster for each student in our class!).  If you need a fun way to lift up your students, help them think positively, increase their adjective use, develop their writing, and just make everyone feel loved, this is the easy, 15 minute project for you!


All you need for this project is large, white construction paper.  You, or a fabulous parent volunteer, just write each student's name as "_____- You are a gift."  Add a little bow to it, and they're ready for the class.
 
 We laid them on each student's desk before they arrived in the morning.  Each student walked around to the other students' desk and wrote a complete sentence about why they appreciate that person or qualities they enjoy.  On the board, I had a list of positive attributes and some sentence stems, like:
 I appreciate how you are ______ and ___________.
You are always _____, __________, and __________, and I love that.
Two admirable traits you have are _______ and ____________.
______, I like how you ______________.
Leave a comment below or check my TeachersPayTeachers account for the free Word document that I typed up for this project.  Students just choose a sentence, the attributes they feel fit the person, and sign their own name.  The goal is for each student to write at least one sentence on everyone's poster.

  It's just that simple.  We decided to put ours up in the hallway; one of the morning tasks will be for each student to go and read everything that people wrote on their poster.  Eventually, each student will take their poster home to keep.  These are the types of things that many kids hang on to for a long time; you never know what might make a difference for students, even years down the road.
Leave a comment with how you might use this, or tell us about something that you do to lift someone else up!

Oregon Trail Day!

After all my students passed the post test for our Oregon History unit, we decided to celebrate with an Oregon Trail Day.  The Oregon State Standards used to have a lot dealing with the westward migration of the 1800's, and it was SUCH a fun unit.  Although we can't do the whole unit because of the standard change, there's still a lot that fits in.  With this Oregon Trail Day, we incorporated writing, literacy, geography, history, and some good old fashioned fun.  Here are some of the things we did:


Costumes
Students were invited to wear their own school-appropriate Oregon emigrant costumes to school, but we also had some prepared.  Besides the random cowboy hats, leather vests & jackets, and bonnet that I have out with our other Oregon history realia, I had an awesome parent make two more things for each student.  Using one large piece of construction paper, she made one of these bonnets in a variety of colors for each student (some didn't want one, but even most of they boys thought they were awesome, and eagerly wore it all day long and took it carefully home).

Even our amazing principal donned a bonnet when  he came to present our Principal Award winner for this week.  The kids were thrilled.


From paper grocery bags, we made these fun "leather" vests.  Students also thought these were very cool, although they were a bit difficult to move around in.


Diaries
Each student made up their own pioneer name, and their table group was their family, so they decided on a common last name.  Students determined their age, gender, likes and dislikes, and wrote about their life on the trail.  We actually started this activity a few days before Oregon Trail Day so that the students were on their third diary entry by the time we got all dressed up and read our diaries to each other.  Here are some of the students reading their diary entries:


Little House Read Aloud with Peppermint Sticks
Because Christmas is just around the corner, I read the Christmas chapter from Little House in the Big Woods, by Laura Ingalls Wilder.  When it got to the part about the children getting a peppermint stick in their stockings, we handed out candy canes and they enjoyed their small dose of mint & high fructose corn syrup while I finished reading the chapter. (We learn about a variety of cultural celebrations and students are invited to share their own family's traditions with the class too).

Oregon Trail Computer Game on the SMARTBoard!
Every student gets to press something on the Smartboard as we play the 4th Edition Oregon Trail Game.  We go fishing, plant gathering, hunting, talking to people, visiting forts and landmarks along the way, etc, and they LOVE IT!  Every day for the last two weeks, we have played it during lunch, and every day I have students ask if they can stay in from their recess to continue playing it.


Photos of Mrs. Madison Posing on Every Oregon Trail Monument Open to the Public
This is the part of the day where my students crack up at pictures of me posing near/at/on/in a variety of Oregon Trail landmarks. 


Oregon Trail Chants/Songs
I am an English to Speakers of Other Languages (ESOL) teacher, so language learning is important to me.  One of the GLAD (Guided Language Acquisition Design) strategies that I use throughout the year in all subject areas is chants/songs.  Each student in my class has their own chant book with a copy of all of the chants that we do during the year, and they get to take it home during the summer. Here are some students practicing singing some Oregon Trail chants with a partner:

  If you would like a copy of some additional chants, let me know in the comments below.  I have chants for nearly everything for third and fourth grade.  They help students build reading fluency, vocabulary, and content knowledge, and they are an excellent resource for teachers.

Oregon Trail Foldables
See my other posting about these fun vocabulary foldables that can easily be adapted to any set of vocabulary that you want your students to learn here- http://applesofyoureye.blogspot.com/2013/01/vocabulary-foldables.html 

Spinning/Fiber Arts
My mom is awesome, so she brought in her spinning wheel and a variety of fibers and wool to share with my class.  She led a mini-lesson on fiber arts and showed the students how to use a spinning wheel.  Then, each student got a piece of wool to "spin" with their hands to make a bracelet or bookmark.  We ran out of time to have every student finish the project, but they got to take their wool home, with which they were very happy.
What fun theme-centered activities have you done?  Can you think of a way to adapt one of these activities to fit a different theme?  Leave a comment below, and head out west with your class!


Vocabulary Foldables


 Happy Holidays, everyone!  We continue to have a very Merry Christmas in the Madison household (since we're Catholic, Christmas lasts 12 days!), and I finally have time to post a few fun things we've been working on the last few months.  Why not start off the new year with some fun foldables?  They are easily adaptable for any subject and really help with vocabulary development.  You can make a fun bulletin with them like this:


That way, not only your students, but students passing by your room will increase their vocabulary as well!  I even had a few adults tell me they didn't know some of the vocabulary words that our students were using.  This particular set of vocabulary foldables is for our Oregon Trail/Westward Migration unit.

 Here is the basic breakdown of these foldables:  fold a sheet of paper in half.  That's it! :)  There are a lot of different types of foldables, and I'll post some more complex ones later, but this is just as easy as it gets.  Still, just working on different kind of paper than they're used to and folding it is enough of a nuance for students to make it exciting.  It also makes for a couple good games when they're done.
 
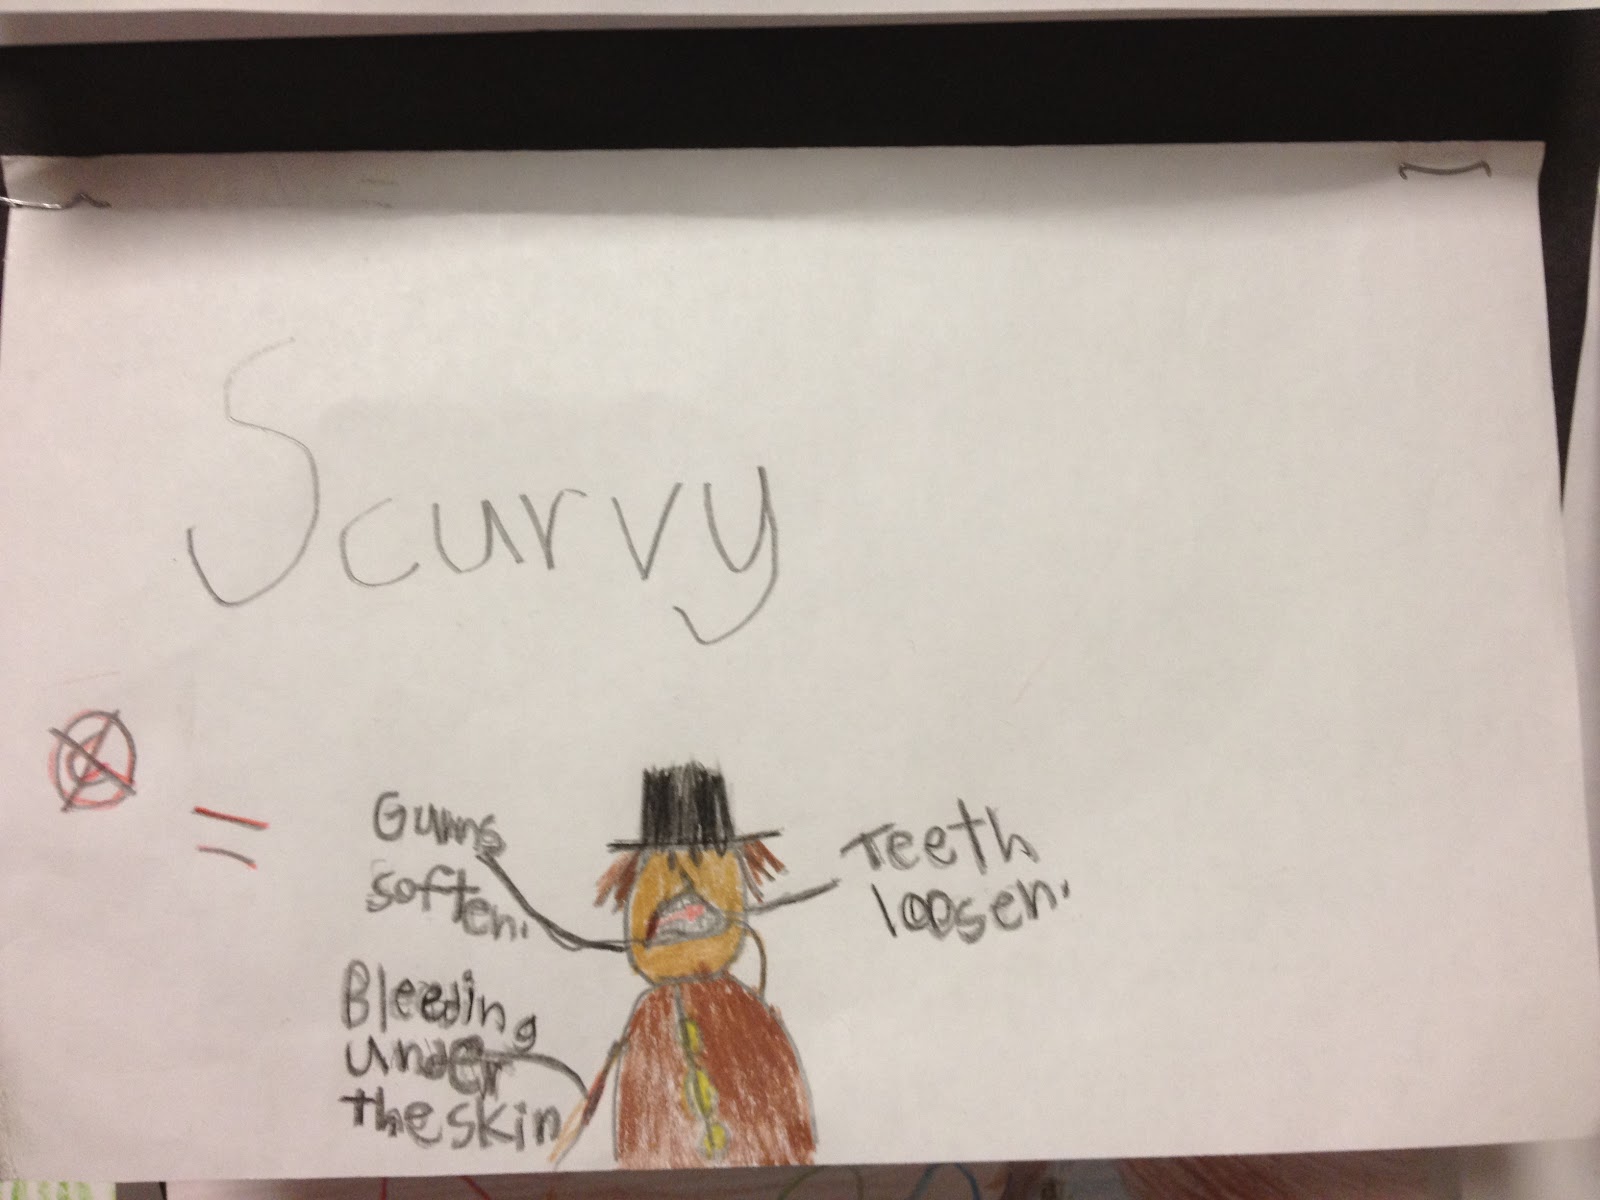
On the front, each student writes one word (I wanted to do a game with these and hang them in the hallway for others to learn from, so I made them all choose different vocabulary words from the unit, particularly, from a non-fiction read aloud that we did from an Oregon Trial book).  Then they do a picture that symbolizes the meaning of that word.  In the example below, you'll see the word "Scurvy"along with an adorable picture of a pioneer who has softening gums, bleeding skin, and teeth coming out of his skull.  No one said foldables have to be sweet, and the boys in the class particularly enjoy the more gruesome vocabulary words!
 On the inside of the folded paper, your students will write the word again, along with the dictionary definition of the word.  This is yet another time that we practice dictionary skills, and the students already have a basic understanding of their new word from the non-fiction text that we read aloud from.  If you are giving the words to your students "cold," you will probably need to help some of them decipher what the dictionary definition actually means.  Last, they write a complete sentence using the new vocabulary word.  I just love the sentence this student created- "I'm sorry, your brother has scurvy."  I had my students take a few minutes to color their foldable and trace the pencil in colored pencil after I checked them over since we were "publishing" them in the hall.
 Now the fun begins.  One game that I play with these is Musical Vocab Partner.  Each student walks around with their foldable up against their own chest.  I play music, and when the music stops, each student rushes to find a partner.  They read their partner's word aloud and try to guess at the meaning of the word based upon the picture they see on the front of their partner's foldable.  Then their partner tells them how well they did.  I usually use sentence frames like:

I think your word _______ means ____________ because your picture shows ________________.
I predict that your word ________ means _________ because your picture depicts ___________.

You are correct/close, my word ______ means ___________.
The definition of my word, _______, is _______________, which means your prediction was correct/close.

With any leftover time, they read their partner's foldable aloud and then their partner reads their foldable aloud, practicing for fluency and cementing the new word in place.  I start the music again, and they learn a new word.
 If I already have the bulletin board up, I usually make it a morning activity (one of the first tasks that they need to accomplish after getting their things settled before we start instruction) to go out and take a look at the bulletin.  Sometimes, I'll have them write down what they think was the trickiest word on a piece of scratch paper, along with its definition and sentence and then turn it in.  I might have them use the above sentence stems to just write about one of the words they see on the bulletin, and then check their own understanding by lifting the foldable flap.  When we have our little first grade buddies over, I have each student explain their word and show their buddy their foldable (they are often given as a buddy 'gift' as well).  Sometimes we send our foldables to our pen pals, which gives the students another reason to make them look great and gives the writing more purpose. 
  
What foldables have you used?  Do you have any fun games or activities that you use them with?  What other vocabulary development activities do you do?  Comment, share, repost, and have a fabulous 2013!